
Mounting the Copper Tape
for a clean roof without moss and algae
Mounting
Where Do I Install the Anti Moss Tape?
Illustration of Mounting MOOSfree®
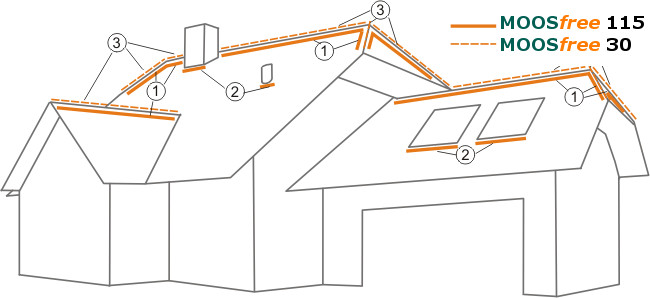
MOOSfree® 115 or 170 will be usually installed on both sides of the roof ridge, generally on the first row of roof tiles under the ridge tile. The same applies to hipped roofs.
If chimneys, dormers, roof windows, or ventilators divide the flow of water on the roof, there should be mounted a stripe of MOOSfree® below these interruptions. This step is not necessary, if dormers or chimneys are copper-plated.
For a “perfect” solution, MOOSfree® 30 may be additionally installed on the ridge. In this case, MOOSfree® 115 can be mounted on the third row of roof tiles below the ridge, to optimize its’ effectiveness.
Please Take the Following Information into Account to Get a Roof Free of Moss
- Z In order to speed up the cleaning process of roof surfaces affected with large amounts of moss, lichen and algae, a prior roof cleaning should be considered. In the initial phase of self-cleaning, gutters will need to be cleaned more often to free them of dead moss and lichen.
- Z The tile surface in the bondig area must be clean (free of moss), dry and free of grease and dust. The temperature at the time of mounting must be above +5°C. The higher the processing temperature, the higher the tack.
- Q Installation of MOOSfree® directly on the ridge tiles so that the copper tape could act on both sides of the roof at the same time is not recommended. This reduces the function of MOOSfree®, because the copper ions are distributed over the double roof area. The lower the concentration of copper ions in rainwater, the lower the harming effect on mosses and lichens.

- s MOOSfree® must not be mounted above bare zinc or titanium zinc gutters or sheets. Such components have to be coated. Otherwise they could be destroyed because of pitting corrosion. (for further information see e.g. „Compatibility of metals with one another, in particular the release of copper ions“). CoTexx cannot assume any warranty for the coating of such materials.
- s MOOSfree® must not have any direct electrical contact with base metals such as aluminium. Using MOOSfree® above components made of stainless steel or anodised aluminium is considered technically unobjectionable.
- Z The corresponding terms of Government Safety Organisations – especially concerning accident prevention – must be observed.
Mounting Instructions
Step by Step to a Moss-Free Roof
Surface Preparation:
MOOSfree® will be stuck directly onto the roof covering using the two integrated butyl strips. Butyl ensures reliable bonding of the anti-moss tape, even on rough or concrete roof tiles. Preconditions are a dry, dust and dirt-free adhesive surface. Contaminations should be removed mechanically with a hard plastic or wire brush. Lichen and moss directly under the copper tape would die at first and are therefore not a suitable surface for permanent bonding of the copper knitted fabric.
Remove Protection Foil:
Remove both release-papers of the butyl tape placed onto the bottom copper layer to about 40 to 50 cm.


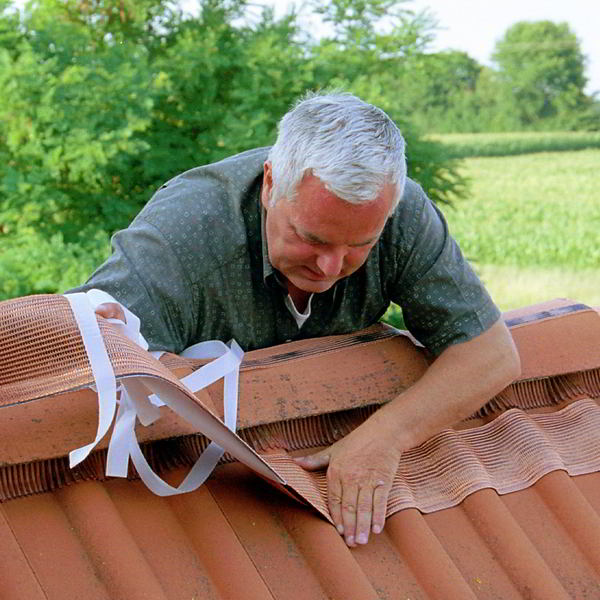
stick MOOSfree® onto the Tiles:
MOOSfree® Align either MOOSfree® 115 or 170 starting at the verge of the roof tile and press on with your hand. Avoid mounting the tape under too much tension, otherwise the adhesive area would be reduced.
The further the processing temperature is above the minimum temperature of 5 ° C, the higher the tack.
Roll over MOOSfree®:
Roll over the tape with a wallpaper roller made of hard plastic or metal and press the butyl adhesive tape on the roof tiles.


Attach Completion Tape:
MOOSfree® may be shortened with scissors. To cover joints and ends, install a strip of completion tape. Remove the seperating foil of the butyl side, position the strip and press it down firmly by hand.
Mount MOOSfree® 30:
For a „perfect solution“ MOOSfree® 30 may be installed additionally on the ridge or below windows using the procedure mentioned above. The installation sketch gives you further advice.


Finish Installation:
Check again, if every end or joint of the Moss Removal Tape is covered with a strip of completion tape. Thereby MOOSfree® will be optimally protected from sliding snow.
If a Lightning Protection is Installed:
In this case, the entire copper tape must be connected to the lightning protection rod. Special adapters made of copper, which are available as an accessory, have to be screwed every 2 m over the entire length. This procedure is not necessary for MOOSfree® 30 that has been mounted on the ridge.
